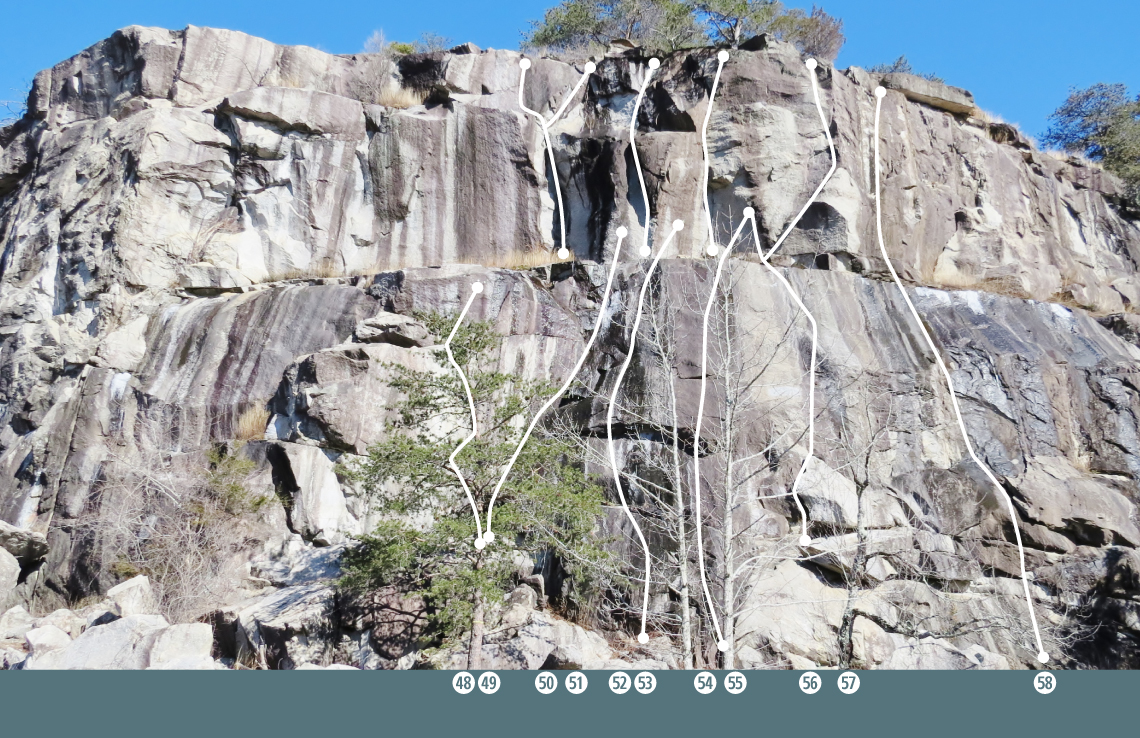
Routes:
48. Lightning Crack (5.10D) Short, strenuous hand crack to anchors.
49. Safety Ledge (5.9) Safety ledge follows a right facing corner. This route is usually wet but when the conditions are right this is a great warm up for the area. It ends at the anchors above the ledge.
50. Air Mantle (5.11) Top Tier. Is an alternate finish to Ain’t This A Mess. Move left at the end of the fingertip layback crack.
51. Ain’t This A Mess (5.11B/C) Top Tier. Start off the Ledge above Lightning Crack and follow a layback corner system passing an old piton to thin fingers then move right to anchors.
52. Rebel Yell (5.11+) Top Tier. It is an extension to Safety Ledge or Snake Charmer. This route climbs a brilliant white shallow dihedral. There are two exit strategies to reach the anchors. Don’t forget to let out a “Rebel Yell” when you successfully reach the anchors.
53. Snake Charmer (5.10 B/C) Another quality slab that is quite technical. To the right of Safety Ledge. 6 bolts and anchors.
54. Bullistics (5.10B) Top Tier. Located above Snake Charmer. It is an extension to any of the lower slab routes. Follow the strenuous layback crack in the dihedral while smearing and stemming to an awkward finish. 4 bolts and anchors.
55. Somebody Open My Dew (5.11A) Make some easy moves to reach a stance to the left of a sharp upward pointing flake. Move left and get established under a small bulge/roof. Clip bolts below the bulge and one bolt above it. Pulling over the bulge is the crux. Head up the steep slab to a small ledge with double bolt anchors.
56. Hidden-mite Short (5.9+) Climb pass the first section of Hidden-mite passing 5 bolts. Once on the ledge, traverse left to the anchors of Somebody Open My Dew. 5 bolts and anchors.
57. Hidden-mite (5.11B/C) Climb up a flake and then slab climb pass 5 bolts (5.9+) to a good stance. Climb pass four more bolts to the crux finish to the anchors.
58. The General Lee (5.11A) Climb pass 9 bolts to anchors.

